簡介
MQL 語言的新版本向自動交易系統的開發人員提供實施複雜任務的有效工具。不可否認,語言的編程能力已經得到極大的擴展。MQL5 面向對象的編程功能尤其值得一提。此外,也不能忽視標準庫。通過錯誤代碼 359 來判斷,將很快支持類模板。
在本文中,我將通過描述數據類型和它們的集合來介紹什麼在某種形式上可能是本文主題的擴展或延續。在這里,我要引用一篇在 MQL5.community 網站上發布的文章。Dmitry Fedoseev (Integer) 在他的 "MQL5 Programming Basics:Arrays"(MQL5 編程基礎:數組)一文中極為詳細且全面地描述了使用數組的原則和邏輯。
因此,今天我將轉向列表,更加確切地說,轉向線性鏈表。我們將從列表結構、含義及邏輯開始。之後,我們將探討已經包含在標準庫中的相關工具。最後,我將提供一個在使用 MQL5 時如何運用列表的例子。
- 列表和節點的概念:理論
- 1.1 單向鏈表中的節點
- 1.2 雙向鏈表中的節點
- 1.3 循環雙向鏈表中的節點
- 1.4 主要的列表操作
- 列表和節點的概念:編程
- 2.1 單向鏈表中的節點
- 2.2 雙向鏈表中的節點
- 2.3 松散雙向鏈表中的節點
- 2.4 單向鏈表
- 2.5 雙向鏈表
- 2.6 松散雙向鏈表
- 2.7 循環雙向鏈表
- MQL5 標準庫中的列表
- 在 MQL5 中使用列表的例子
- 4.1 處理圖形對象
- 4.2 處理虛擬交易
1. 列表和節點的概念:理論
那麼,對於開發者而言,什麼是列表?怎麼處理列表?我要引用公共信息源維基百科對此術語的一般定義:
在計算機科學中,列表是一種抽象數據類型,實施一種有限而有序的值的集合,其中相同的值可以出現多次。列表的一個實例是有限序列 - 元組這一數學概念的計算機表示。在列表中,一個值的每個實例通常稱為列表的一個項目、條目或元素;如果相同的值出現多次,每一次出現都被視為一個分立的項目。
術語“列表”也用於幾種有形的數據結構,這些結構可用於實施抽象列表,尤其是鏈表。
我相信您會同意這一定義在某種程度上太學究氣了。
出於本文的目的,我們對此定義的最後一句更有興趣。因此,讓我們在此基礎上稍作展開。
在計算機科學中,鏈表是一個基本的動態數據結構,由若幹節點組成,其中每個節點包含數據和一個或兩個到鏈表的下一個和/或上一個節點的引用(“鏈接)。[1]鏈表相對於傳統數組的主要優勢在於結構靈活性:鏈表中項目的順序不需要與計算機內存中數據元素的順序一致,同時始終為列表遍曆維持列表項目的內部鏈接。
讓我們嘗試一步接一步地深入了解。
在計算機科學中,列表本身是某種數據類型。我們已經確定了這一點。它是一種綜合數據類型,因為它包含其它數據類型。列表在一定程度上類似於數組。如果曾經將單一類型的數據組成的數組歸類為一個新的數據類型,則該數組應該是列表。但並不是完全如此。
列表的主要優勢在於在需要時,它允許在列表的任何位置插入或刪除節點。在這里,除了對於列表,您不需要總是要使用 ArrayResize() 函數以外,列表類似於動態數組。
就內存元素的順序而言,沒有保存列表節點,並且不需要按相鄰內存區域中數組元素的相同存儲方式存儲列表節點。
或多或少是這樣的。讓我們更加深入地探討列表。
1.1 單向鏈表中的節點
列表允許您存儲節點而不是項目。節點是一種數據類型,由兩部分組成。
第一部分是數據字段,第二部分用於其它節點的鏈接(圖 1)。列表中的第一個節點稱為“頭”,列表中的最後一個節點稱為“尾”。尾鏈接字段包含一個 NULL 引用。基本而言,它用於表示列表沒有更多的節點了。其它專業資料將列表中頭以下的部分稱為“尾”。

圖 1 單向鏈表中的節點
除了單向列表節點以外,還有其它類型的節點。雙向鏈表中的節點或許是更常見的節點。
1.2 雙向鏈表中的節點
我們還需要一種滿足雙向鏈表需要的節點。它與前一類型的不同之處在於它包含指向前一節點的另一鏈接。列表的頭節點自然包含一個 NULL 引用。在顯示包含此類節點的列表的結構圖(圖 2)中,指向前一節點的鏈接顯示為紅色箭頭。

圖. 2 雙向鏈表中的節點
因此,雙向鏈表節點的能力將與單向鏈表節點的類似。您只需要多處理一個到前一節點的鏈接。
1.3 循環雙向鏈表中的節點
也有可在非線性列表中使用以上節點的情形。盡管本文將主要描述線性列表,我也會提供一個循環列表的例子。

圖 3 循環雙向鏈表中的節點
循環雙向鏈表圖(圖 3)顯示具有兩個鏈接字段的節點是簡單的循環鏈接。這通過使用橙色和綠色箭頭來表示。因此,頭節點將被鏈接到尾節點(作為上一元素)。尾節點的鏈接字段不會是空的,因為它將指向頭節點。
1.4 主要的列表操作
如專業文獻所指出,所有列表操作都可分為 3 個基礎組:
- 添加(新節點至列表);
- 刪除(列表中的節點);
- 檢查(節點的數據)。
添加方法包括:
- 向列表的開頭添加新節點;
- 向列表的末尾添加新節點;
- 在列表的指定位置添加新節點;
- 向一個空列表添加節點;
- 參數化構造函數。
至於涉及的刪除操作,它們幾乎是添加組對應操作的鏡像:
- 刪除頭節點;
- 刪除尾節點;
- 在列表的指定位置刪除節點;
- 析構函數。
在這里,我願意指出,析構函數不僅用於正確完成並終止列表操作,還用於正確地刪除其所有元素。
各種檢查操作組成的第三組事實上提供了對列表中各個節點或節點值的訪問:
- 搜索給定值;
- 檢查列表是否為空的;
- 獲取列表中第 i 個節點的值;
- 獲取列表中第 i 個節點的指針;
- 獲取列表大小;
- 打印列表元素的值。
除了基礎組以外,我還分離出第四組,即服務組。它為前幾個組服務:
- 賦值運算符;
- 複制構造函數;
- 處理動態指針;
- 按值複制列表;
- 排序。
就是這樣。當然,開發者可以依據需要隨時擴展列表類的功能。
2. 列表和節點的概念:編程
在這一部分,我建議我們應直接開始對節點和列表進行編程。將在必要時提供代碼的說明。
2.1 單向鏈表中的節點
讓我們為滿足單向鏈表需要的節點類打下地基(圖 4)。您可以在 "如何使用 UML 工具開發 EA 交易"(如何使用 UML 工具開發 EA 交易)一文中熟悉類圖符號(模型)(請參閱圖 5. CTradeExpert 類的 UML 模型)。

圖 4 CiSingleNode 類模型
現在,讓我們嘗試處理代碼。它以 Art Friedman 和其他作者的"C/C++ Annotated Archives"(C/C++ 注解大全)一書提供的例子為基礎。
//+------------------------------------------------------------------+
//|                     CiSingleNode class                           |
//+------------------------------------------------------------------+
class CiSingleNode
  {
protected:
   int               m_val;   // data
   CiSingleNode     *m_next;  // pointer to the next node
public:
   void              CiSingleNode(void);                             // default constructor
   void              CiSingleNode(int _node_val);                    // parameterized constructor
   void             ~CiSingleNode(void);                             // destructor
   void              SetVal(int _node_val);                          // set-method for data
   void              SetNextNode(CiSingleNode *_ptr_next);           // set-method for the next node
   virtual void      SetPrevNode(CiSingleNode *_ptr_prev){};         // set-method for the previous node
   virtual CiSingleNode *GetPrevNode(void) const {return NULL;};     // get-method for the previous node
   CiSingleNode     *GetNextNode(void) const;                        // get-method for the next node
   int               GetVal(void){TRACE_CALL(_t_flag) return m_val;} // get-method for data
  };
我不會解釋 CiSingleNode 類的每一種方法。您可以在附帶的文件 CiSingleNode.mqh 中更加詳細地研究它們。然而,我要提醒您注意一個有趣的細節。類包含處理以前節點的虛擬方法。事實上,它們是虛設的,它們的存在僅僅是為了將來後代的多態現象。
代碼使用跟蹤使用的每個方法的調用所需的 TRACE_CALL(f) 預處理器指令。
#define TRACE_CALL(f) if(f) Print("Calling: "+__FUNCSIG__);
僅有 CiSingleNode 類可用,您處於創建一個單向鏈表的情形之中。讓我給您一個代碼的例子。
//=========== Example 1 (processing the CiSingleNode type )

   CiSingleNode *p_sNodes[3];                             // #1
   p_sNodes[0]=NULL;
   srand(GetTickCount()); // initialize a random number generator
//--- create nodes
   for(int i=0;i<ArraySize(p_sNodes);i++)
      p_sNodes[i]=new CiSingleNode(rand());               // #2
//--- links
   for(int j=0;j<(ArraySize(p_sNodes)-1);j++)
      p_sNodes[j].SetNextNode(p_sNodes[j+1]);             // #3
//--- check values
   for(int i=0;i<ArraySize(p_sNodes);i++)
     {
      int val=p_sNodes[i].GetVal();                       // #4
      Print("Node #"+IntegerToString(i+1)+                // #5
            " value = "+IntegerToString(val));
     }
//--- check next-nodes
   for(int j=0;j<(ArraySize(p_sNodes)-1);j++)
     {
      CiSingleNode *p_sNode_next=p_sNodes[j].GetNextNode(); // #9
      int snode_next_val=p_sNode_next.GetVal();             // #10
      Print("Next-Node #"+IntegerToString(j+1)+             // #11
            " value = "+IntegerToString(snode_next_val));
     }
//--- delete nodes
   for(int i=0;i<ArraySize(p_sNodes);i++)
      delete p_sNodes[i];                                   // #12
在字符串 #1 中,我們聲明一個指向類型為 CiSingleNode 的對象的指針數組。在字符串 #2 中,該數組被填以創建的指針。對於每個節點的數據,我們使用 rand() 函數,在 0 至 32767 的範圍內取用偽隨機整數。在字符串 #3 中,節點鏈接到 到下一指針。在字符串 #4-5 中,我們檢查節點的值,在字符串 #9-11 中,我們檢查鏈接的執行。在字符串 #12 中刪除指針。
以下是記錄到日誌的內容。
DH      0       23:23:10        test_nodes (EURUSD,H4)  Node #1 value = 3335
KP      0       23:23:10        test_nodes (EURUSD,H4)  Node #2 value = 21584
GI      0       23:23:10        test_nodes (EURUSD,H4)  Node #3 value = 917
HQ      0       23:23:10        test_nodes (EURUSD,H4)  Next-Node #1 value = 21584
HI      0       23:23:10        test_nodes (EURUSD,H4)  Next-Node #2 value = 917
可以用下圖(圖 5)示意性地表示生成的節點結構。
![圖 5 CiSingleNode *p_sNodes[3] 數組中節點之間的鏈接](https://c.mql5.com/2/6/5__1.png "圖 5 CiSingleNode *p_sNodes[3] 數組中節點之間的鏈接")
圖 5 CiSingleNode *p_sNodes[3] 數組中節點之間的鏈接
現在,讓我們研究雙向鏈表中的節點。
2.2 雙向鏈表中的節點
首先,我們需要重溫一下,雙向鏈表節點的不同之處在於它有兩個指針:下一節點指針和前一節點指針,即除了下一節點鏈接以外,您還需要向單向鏈表節點添加一個指向前一節點的指針。
為此,我建議使用繼承作為類關系。這樣,雙向鏈表節點的類模型看起來如下所示(圖 6)。

圖 6 CDoubleNode 類模型
現在,是時候查看代碼了。
//+------------------------------------------------------------------+
//|                    CDoubleNode class                             |
//+------------------------------------------------------------------+
class CDoubleNode : public CiSingleNode
  {
protected:
   CiSingleNode     *m_prev;  // pointer to the previous node

public:
   void              CDoubleNode(void);                     // default constructor
   void              CDoubleNode(int node_val);             // parameterized constructor
   void             ~CDoubleNode(void){TRACE_CALL(_t_flag)};// destructor
   virtual void      SetPrevNode(CiSingleNode *_ptr_prev);  // set-method for the previous node
   virtual CiSingleNode *GetPrevNode(void) const;           // get-method for the previous node CDoubleNode
  };
只有很少的幾個其它方法 - 它們是虛擬的,並且與處理前一節點有關。在 CDoubleNode.mqh 中提供了完整的類描述。
讓我們嘗試依據 CDoubleNode 類創建一個雙向鏈表。讓我給您一個代碼的例子。
//=========== Example 2 (processing the CDoubleNode type)

   CiSingleNode *p_dNodes[3];                             // #1
   p_dNodes[0]=NULL;
   srand(GetTickCount()); // initialize a random number generator
//--- create nodes
   for(int i=0;i<ArraySize(p_dNodes);i++)
      p_dNodes[i]=new CDoubleNode(rand());                // #2
//--- links
   for(int j=0;j<(ArraySize(p_dNodes)-1);j++)
     {
      p_dNodes[j].SetNextNode(p_dNodes[j+1]);             // #3
      p_dNodes[j+1].SetPrevNode(p_dNodes[j]);             // #4
     }
//--- check values
   for(int i=0;i<ArraySize(p_dNodes);i++)
     {
      int val=p_dNodes[i].GetVal();                       // #4
      Print("Node #"+IntegerToString(i+1)+                // #5
            " value = "+IntegerToString(val));
     }
//--- check next-nodes
   for(int j=0;j<(ArraySize(p_dNodes)-1);j++)
     {
      CiSingleNode *p_sNode_next=p_dNodes[j].GetNextNode(); // #9
      int snode_next_val=p_sNode_next.GetVal();             // #10
      Print("Next-Node #"+IntegerToString(j+1)+             // #11
            " value = "+IntegerToString(snode_next_val));
     }
//--- check prev-nodes
   for(int j=0;j<(ArraySize(p_dNodes)-1);j++)
     {
      CiSingleNode *p_sNode_prev=p_dNodes[j+1].GetPrevNode(); // #12
      int snode_prev_val=p_sNode_prev.GetVal();               // #13
      Print("Prev-Node #"+IntegerToString(j+2)+               // #14
            " value = "+IntegerToString(snode_prev_val));
     }
//--- delete nodes
   for(int i=0;i<ArraySize(p_dNodes);i++)
      delete p_dNodes[i];                                     // #15
原則上,這與創建單向鏈表類似,但仍然有一些特性。注意指針數組 p_dNodes[] 是如何在字符串 #1 中聲明的。指針的類型可以設置為與基類相同。字符串 #2 中的多態性原則將幫助我們在以後識別它們。在字符串 #12-14 中檢查前一節點。
向日誌添加了以下信息。
GJ      0       16:28:12        test_nodes (EURUSD,H4)  Node #1 value = 17543
IQ      0       16:28:12        test_nodes (EURUSD,H4)  Node #2 value = 1185
KK      0       16:28:12        test_nodes (EURUSD,H4)  Node #3 value = 23216
DS      0       16:28:12        test_nodes (EURUSD,H4)  Next-Node #1 value = 1185
NH      0       16:28:12        test_nodes (EURUSD,H4)  Next-Node #2 value = 23216
FR      0       16:28:12        test_nodes (EURUSD,H4)  Prev-Node #2 value = 17543
LI      0       16:28:12        test_nodes (EURUSD,H4)  Prev-Node #3 value = 1185
可以用下圖(圖 7)示意性地表示生成的節點結構:
![圖 7 CDoubleNode *p_sNodes[3] 數組中節點之間的鏈接](https://c.mql5.com/2/6/7.png "圖 7 CDoubleNode *p_sNodes[3] 數組中節點之間的鏈接")
圖 7 CDoubleNode *p_sNodes[3] 數組中節點之間的鏈接
現在,我建議我們考慮一個在創建松散雙向鏈表時需要的節點。
2.3 松散雙向鏈表中的節點
試想這樣一個節點,它包含可歸於整個數組的數據成員(而不是單一值),即包含和描述整個數組。然後,可用此類節點來創建一個松散列表。我已經決定在這里不提供任何說明,因為此節點與雙向鏈表中的標準節點完全相同。唯一區別在於“數據”屬性封裝了整個數組。
我將再次使用繼承。CDoubleNode 類將用作松散雙向鏈表節點的基類。松散雙向鏈表節點的類模型將如下所示(圖 8)。

圖 8 CiUnrollDoubleNode 類模型
可以使用以下代碼定義 CiUnrollDoubleNode 類:
//+------------------------------------------------------------------+
//|                    CiUnrollDoubleNode class                      |
//+------------------------------------------------------------------+
class CiUnrollDoubleNode : public CDoubleNode
  {
private:
   int               m_arr_val[]; // data array

public:
   void              CiUnrollDoubleNode(void);               // default constructor
   void              CiUnrollDoubleNode(int &_node_arr[]);   // parameterized constructor
   void             ~CiUnrollDoubleNode(void);               // destructor
   bool              GetArrVal(int &_dest_arr_val[])const;   // get-method for data array
   bool              SetArrVal(const int &_node_arr_val[]);  // set-method for data array
  };
您可以在 CiUnrollDoubleNode.mqh 中更加詳細地查看每種方法。
讓我們以一個參數化構造函數為例。
//+------------------------------------------------------------------+
//|                   Parameterized constructor                      |
//+------------------------------------------------------------------+
void CiUnrollDoubleNode::CiUnrollDoubleNode(int &_node_arr[])
   : CDoubleNode(ArraySize(_node_arr))
  {
   ArrayCopy(this.m_arr_val,_node_arr);
   TRACE_CALL(_t_flag)
  }
在這里,我們使用初始化列表,在數據成員 this.m_val 中輸入一個一維數組的大小。
之後,我們“手動”創建一個松散雙向鏈表並檢查其中的鏈接。
//=========== Example 3 (processing the CiUnrollDoubleNode type)

//--- data arrays
   int arr1[],arr2[],arr3[];                                  // #1
   int arr_size=15;
   ArrayResize(arr1,arr_size);
   ArrayResize(arr2,arr_size);
   ArrayResize(arr3,arr_size);
   srand(GetTickCount()); // initialize a random number generator

//--- fill the arrays with pseudorandom integers
   for(int i=0;i<arr_size;i++)
     {
      arr1[i]=rand();                                         // #2
      arr2[i]=rand();
      arr3[i]=rand();
     }
//--- create nodes
   CiUnrollDoubleNode *p_udNodes[3];                          // #3
   p_udNodes[0]=new CiUnrollDoubleNode(arr1);
   p_udNodes[1]=new CiUnrollDoubleNode(arr2);
   p_udNodes[2]=new CiUnrollDoubleNode(arr3);
//--- links
   for(int j=0;j<(ArraySize(p_udNodes)-1);j++)
     {
      p_udNodes[j].SetNextNode(p_udNodes[j+1]);               // #4
      p_udNodes[j+1].SetPrevNode(p_udNodes[j]);               // #5
     }
//--- check values
   for(int i=0;i<ArraySize(p_udNodes);i++)
     {
      int val=p_udNodes[i].GetVal();                          // #6
      Print("Node #"+IntegerToString(i+1)+                    // #7
            " value = "+IntegerToString(val));
     }
//--- check array values
   for(int i=0;i<ArraySize(p_udNodes);i++)
     {
      int t_arr[]; // destination array
      bool isCopied=p_udNodes[i].GetArrVal(t_arr);            // #8
      if(isCopied)
        {
         string arr_str=NULL;
         for(int n=0;n<ArraySize(t_arr);n++)
            arr_str+=IntegerToString(t_arr[n])+", ";
         int end_of_string=StringLen(arr_str);
         arr_str=StringSubstr(arr_str,0,end_of_string-2);
         Print("Node #"+IntegerToString(i+1)+                 // #9
               " array values = "+arr_str);
        }
     }
//--- check next-nodes
   for(int j=0;j<(ArraySize(p_udNodes)-1);j++)
     {
      int t_arr[]; // destination array
      CiUnrollDoubleNode *p_udNode_next=p_udNodes[j].GetNextNode(); // #10
      bool isCopied=p_udNode_next.GetArrVal(t_arr);
      if(isCopied)
        {
         string arr_str=NULL;
         for(int n=0;n<ArraySize(t_arr);n++)
            arr_str+=IntegerToString(t_arr[n])+", ";
         int end_of_string=StringLen(arr_str);
         arr_str=StringSubstr(arr_str,0,end_of_string-2);
         Print("Next-Node #"+IntegerToString(j+1)+
               " array values = "+arr_str);
        }
     }
//--- check prev-nodes
   for(int j=0;j<(ArraySize(p_udNodes)-1);j++)
     {
      int t_arr[]; // destination array
      CiUnrollDoubleNode *p_udNode_prev=p_udNodes[j+1].GetPrevNode(); // #11
      bool isCopied=p_udNode_prev.GetArrVal(t_arr);
      if(isCopied)
        {
         string arr_str=NULL;
         for(int n=0;n<ArraySize(t_arr);n++)
            arr_str+=IntegerToString(t_arr[n])+", ";
         int end_of_string=StringLen(arr_str);
         arr_str=StringSubstr(arr_str,0,end_of_string-2);
         Print("Prev-Node #"+IntegerToString(j+2)+
               " array values = "+arr_str);
        }
     }
//--- delete nodes
   for(int i=0;i<ArraySize(p_udNodes);i++)
      delete p_udNodes[i];                                            // #12
  }
代碼的量變得稍微多一些。這是因為我們需要為每個節點創建並填充一個數組。
數據數組的處理在字符串 #1 中開始。它與我們討論過的前一節點中的處理基本類似。只是我們需要為整個數組打印每個節點的數據值(即字符串 #9)。
結果如下:
IN      0       00:09:13        test_nodes (EURUSD.m,H4)        Node #1 value = 15
NF      0       00:09:13        test_nodes (EURUSD.m,H4)        Node #2 value = 15
CI      0       00:09:13        test_nodes (EURUSD.m,H4)        Node #3 value = 15
FQ      0       00:09:13        test_nodes (EURUSD.m,H4)        Node #1 array values = 31784, 4837, 25797, 29079, 4223, 27234, 2155, 32351, 12010, 10353, 10391, 22245, 27895, 3918, 12069
EG      0       00:09:13        test_nodes (EURUSD.m,H4)        Node #2 array values = 1809, 18553, 23224, 20208, 10191, 4833, 25959, 2761, 7291, 23254, 29865, 23938, 7585, 20880, 25756
MK      0       00:09:13        test_nodes (EURUSD.m,H4)        Node #3 array values = 18100, 26358, 31020, 23881, 11256, 24798, 31481, 14567, 13032, 4701, 21665, 1434, 1622, 16377, 25778
RP      0       00:09:13        test_nodes (EURUSD.m,H4)        Next-Node #1 array values = 1809, 18553, 23224, 20208, 10191, 4833, 25959, 2761, 7291, 23254, 29865, 23938, 7585, 20880, 25756
JD      0       00:09:13        test_nodes (EURUSD.m,H4)        Next-Node #2 array values = 18100, 26358, 31020, 23881, 11256, 24798, 31481, 14567, 13032, 4701, 21665, 1434, 1622, 16377, 25778
EH      0       00:09:13        test_nodes (EURUSD.m,H4)        Prev-Node #2 array values = 31784, 4837, 25797, 29079, 4223, 27234, 2155, 32351, 12010, 10353, 10391, 22245, 27895, 3918, 12069
NN      0       00:09:13        test_nodes (EURUSD.m,H4)        Prev-Node #3 array values = 1809, 18553, 23224, 20208, 10191, 4833, 25959, 2761, 7291, 23254, 29865, 23938, 7585, 20880, 25756
我建議我們應結束對節點的處理,並直接前往不同列表的類定義。可以在腳本 test_nodes.mq5 中找到例子 1-3。
2.4 單向鏈表
現在,讓我們從主要的列表操作組創建一個單向鏈表的類模型(圖 9)。

圖 9 CiSingleList 類模型
很容易看出,CiSingleList 類使用 CiSingleNode 類型的節點。就類之間的關系類型而言,我們可以說:
- CiSingleList 類包含 CiSingleNode 類(複合);
- CiSingleList 類使用 CiSingleNode 類方法(依存關系)。
圖 10 說明了以上關系。

圖 10 CiSingleList 類和 CiSingleNode 類之間的關系類型
讓我們創建一個新類 - CiSingleList。往前看,本文使用的所有其它列表類都以此類為基礎。這是它為什麼如此“豐滿”的原因。
//+------------------------------------------------------------------+
//|                     CiSingleList class                           |
//+------------------------------------------------------------------+
class CiSingleList
  {
protected:
   CiSingleNode     *m_head;    // head
   CiSingleNode     *m_tail;    // tail
   uint              m_size;    // number of nodes in the list
public:
   //--- constructor and destructor
   void              CiSingleList();                              // default constructor
   void              CiSingleList(int _node_val);                 // parameterized constructor
   void             ~CiSingleList();                              // destructor

   //--- adding nodes
   void              AddFront(int _node_val);                         // add a new node to the beginning of the list
   void              AddRear(int _node_val);                          // add a new node to the end of the list
   virtual void      AddFront(int &_node_arr[]){TRACE_CALL(_t_flag)}; // add a new node to the beginning of the list
   virtual void      AddRear(int &_node_arr[]){TRACE_CALL(_t_flag)};  // add a new node to the end of the list
   //--- deleting nodes
   int               RemoveFront(void);                           // delete the head node
   int               RemoveRear(void);                            // delete the node from the end of the list
   void              DeleteNodeByIndex(const uint _idx);          // delete the ith node from the list

   //--- checking
   virtual bool      Find(const int _node_val) const;             // find the required value
   bool              IsEmpty(void) const;                         // check the list for being empty
   virtual int       GetValByIndex(const uint _idx) const;        // value of the ith node in the list
   virtual CiSingleNode *GetNodeByIndex(const uint _idx) const;   // get the ith node in the list
   virtual bool      SetNodeByIndex(CiSingleNode *_new_node,const uint _idx); // insert the new ith node in the list
   CiSingleNode     *GetHeadNode(void) const;                     // get the head node
   CiSingleNode     *GetTailNode(void) const;                     // get the tail node
   virtual uint      Size(void) const;                            // list size
   //--- service
   virtual void      PrintList(string _caption=NULL);             // print the list
   virtual bool      CopyByValue(const CiSingleList &_sList);     // copy the list by values
   virtual void      BubbleSort(void);                            // bubble sorting
   //---templates
   template<typename dPointer>
   bool              CheckDynamicPointer(dPointer &_p);           // template for checking a dynamic pointer
   template<typename dPointer>
   bool              DeleteDynamicPointer(dPointer &_p);          // template for deleting a dynamic pointer

protected:
   void              operator=(const CiSingleList &_sList) const; // assignment operator
   void              CiSingleList(const CiSingleList &_sList);    // copy constructor
   virtual bool      AddToEmpty(int _node_val);                   // add a new node to an empty list
   virtual void      addFront(int _node_val);                     // add a new "native" node to the beginning of the list
   virtual void      addRear(int _node_val);                      // add a new "native" node to the end of the list
   virtual int       removeFront(void);                           // delete the "native" head node
   virtual int       removeRear(void);                            // delete the "native" node from the end of the list
   virtual void      deleteNodeByIndex(const uint _idx);          // delete the "native" ith node from the list
   virtual CiSingleNode *newNode(int _val);                       // new "native" node
   virtual void      CalcSize(void) const;                        // calculate the list size
  };
在 CiSingleList.mqh 中提供了完整的類方法定義。
當我開始開發這個類時,只有 3 個數據成員和幾種方法。但是因為這個類是其它類的基礎,我不得不添加幾個虛擬成員函數。我不會詳細描述這些方法。可以在腳本 test_sList.mq5 中找到使用這個單向鏈表類的例子。
如果在沒有跟蹤標記的情況下運行它,則以下條目將出現在日誌中:
KG      0       12:58:32        test_sList (EURUSD,H1)  =======List #1=======
PF      0       12:58:32        test_sList (EURUSD,H1)  Node #1, val=14
RL      0       12:58:32        test_sList (EURUSD,H1)  Node #2, val=666
MD      0       12:58:32        test_sList (EURUSD,H1)  Node #3, val=13
DM      0       12:58:32        test_sList (EURUSD,H1)  Node #4, val=11
QE      0       12:58:32        test_sList (EURUSD,H1)
KN      0       12:58:32        test_sList (EURUSD,H1)
LR      0       12:58:32        test_sList (EURUSD,H1)  =======List #2=======
RE      0       12:58:32        test_sList (EURUSD,H1)  Node #1, val=14
DQ      0       12:58:32        test_sList (EURUSD,H1)  Node #2, val=666
GK      0       12:58:32        test_sList (EURUSD,H1)  Node #3, val=13
FP      0       12:58:32        test_sList (EURUSD,H1)  Node #4, val=11
KF      0       12:58:32        test_sList (EURUSD,H1)
MK      0       12:58:32        test_sList (EURUSD,H1)
PR      0       12:58:32        test_sList (EURUSD,H1)  =======renewed List #2=======
GK      0       12:58:32        test_sList (EURUSD,H1)  Node #1, val=11
JP      0       12:58:32        test_sList (EURUSD,H1)  Node #2, val=13
JI      0       12:58:32        test_sList (EURUSD,H1)  Node #3, val=14
CF      0       12:58:32        test_sList (EURUSD,H1)  Node #4, val=34
QL      0       12:58:32        test_sList (EURUSD,H1)  Node #5, val=35
OE      0       12:58:32        test_sList (EURUSD,H1)  Node #6, val=36
MR      0       12:58:32        test_sList (EURUSD,H1)  Node #7, val=37
KK      0       12:58:32        test_sList (EURUSD,H1)  Node #8, val=38
MS      0       12:58:32        test_sList (EURUSD,H1)  Node #9, val=666
OF      0       12:58:32        test_sList (EURUSD,H1)
QK      0       12:58:32        test_sList (EURUSD,H1)
腳本填寫了 2 個單向鏈表,然後擴展第二個列表並對其排序。
2.5 雙向鏈表
現在,讓我們嘗試依據前一類型的列表創建一個雙向鏈表。圖 11 說明了雙向鏈表的類模型:

圖 11 CDoubleList 類模型
派生類包含更少的方法,而數據成員則完全缺失。以下是 CDoubleList 類的定義。
//+------------------------------------------------------------------+
//|                      CDoubleList class                           |
//+------------------------------------------------------------------+
class CDoubleList : public CiSingleList
  {
public:
   void              CDoubleList(void);                  // default constructor
   void              CDoubleList(int _node_val);         // parameterized constructor
   void             ~CDoubleList(void){};                // destructor
   virtual bool      SetNodeByIndex(CiSingleNode *_new_node,const uint _idx); // insert the new ith node in the list

protected:
   virtual bool      AddToEmpty(int _node_val);          // add a node to an empty list
   virtual void      addFront(int _node_val);            // add a new "native" node to the beginning of the list
   virtual void      addRear(int _node_val);             // add a new "native" node to the end of the list
   virtual int       removeFront(void);                  // delete the "native" head node
   virtual int       removeRear(void);                   // delete the "native" tail node
   virtual void      deleteNodeByIndex(const uint _idx); // delete the "native" ith node from the list
   virtual CiSingleNode *newNode(int _node_val);         // new "native" node
  };
在 CDoubleList.mqh 中對 CDoubleList 類方法提供了完整的描述。
一般而言,在這里使用的虛擬函數僅用於滿足指向單向鏈表中並不存在的前一節點的指針的需要。
可以在腳本 test_dList.mq5 中找到使用 CDoubleList 類型的列表的例子。它說明了與此列表類型有關的所有常見列表操作。腳本代碼包含一個 特殊的字符串:
CiSingleNode *_new_node=new CDoubleNode(666); // create a new node of CDoubleNode type
並沒有錯誤,因為此類構造在基類指針描述派生類的對象時是普遍接受的。這是繼承的優勢之一。
在 MQL5 中,以及在 С++ 中,指向基類的指針可以指向從該基類派生的子類的對象。但反指就是無效的。
如果您編寫如下所示的代碼字符串:
CDoubleNode*_new_node=new CiSingleNode(666);
編譯器將不會報告錯誤或發出警告,但是程序會運行到此字符串為止。在這個例子中,您將看到一條消息,指出指針引用的對象的類型轉換出錯。因為最近的綁定機制僅在程序正在運行時才起作用,我們需要仔細考慮類之間的關系層次。
運行腳本之後,日誌將包含以下條目:
DN      0       13:10:57        test_dList (EURUSD,H1)  =======List #1=======
GO      0       13:10:57        test_dList (EURUSD,H1)  Node #1, val=14
IE      0       13:10:57        test_dList (EURUSD,H1)  Node #2, val=666
FM      0       13:10:57        test_dList (EURUSD,H1)  Node #3, val=13
KD      0       13:10:57        test_dList (EURUSD,H1)  Node #4, val=11
JL      0       13:10:57        test_dList (EURUSD,H1)
DG      0       13:10:57        test_dList (EURUSD,H1)
CK      0       13:10:57        test_dList (EURUSD,H1)  =======List #2=======
IL      0       13:10:57        test_dList (EURUSD,H1)  Node #1, val=14
KH      0       13:10:57        test_dList (EURUSD,H1)  Node #2, val=666
PR      0       13:10:57        test_dList (EURUSD,H1)  Node #3, val=13
MI      0       13:10:57        test_dList (EURUSD,H1)  Node #4, val=11
DO      0       13:10:57        test_dList (EURUSD,H1)
FR      0       13:10:57        test_dList (EURUSD,H1)
GK      0       13:10:57        test_dList (EURUSD,H1)  =======renewed List #2=======
PR      0       13:10:57        test_dList (EURUSD,H1)  Node #1, val=11
QI      0       13:10:57        test_dList (EURUSD,H1)  Node #2, val=13
QP      0       13:10:57        test_dList (EURUSD,H1)  Node #3, val=14
LO      0       13:10:57        test_dList (EURUSD,H1)  Node #4, val=34
JE      0       13:10:57        test_dList (EURUSD,H1)  Node #5, val=35
HL      0       13:10:57        test_dList (EURUSD,H1)  Node #6, val=36
FK      0       13:10:57        test_dList (EURUSD,H1)  Node #7, val=37
DR      0       13:10:57        test_dList (EURUSD,H1)  Node #8, val=38
FJ      0       13:10:57        test_dList (EURUSD,H1)  Node #9, val=666
HO      0       13:10:57        test_dList (EURUSD,H1)
JR      0       13:10:57        test_dList (EURUSD,H1)
如單向鏈表的例子,腳本填充第一個(雙向鏈)表,然後複制並傳遞到第二個列表。之後,它增加第二個列表中的節點數量,排序並打印列表。
2.6 松散雙向鏈表
此列表類型的方便之處在於它不僅允許您存儲值,還允許您存儲整個數組。
讓我們為 CiUnrollDoubleList 類型的列表打下地基(圖 12)。

圖 12 CiUnrollDoubleList 類模型
因為在這里我們將處理一個數據數組,我們必須重新定義在間接基類 CiSingleList 中定義的方法。
以下是 CiUnrollDoubleList 類的定義。
//+------------------------------------------------------------------+
//|                     CiUnrollDoubleList class                     |
//+------------------------------------------------------------------+
class CiUnrollDoubleList : public CDoubleList
  {
public:
   void              CiUnrollDoubleList(void);                      // default constructor
   void              CiUnrollDoubleList(int &_node_arr[]);          // parameterized constructor
   void             ~CiUnrollDoubleList(void){TRACE_CALL(_t_flag)}; // destructor
   //---
   virtual void      AddFront(int &_node_arr[]);                    // add a new node to the beginning of the list
   virtual void      AddRear(int &_node_arr[]);                     // add a new node to the end of the list
   virtual bool      CopyByValue(const CiSingleList &_udList);      // copy by values
   virtual void      PrintList(string _caption=NULL);               // print the list
   virtual void      BubbleSort(void);                              // bubble sorting

protected:
   virtual bool      AddToEmpty(int &_node_arr[]);                  // add a node to an empty list
   virtual void      addFront(int &_node_arr[]);                    // add a new "native" node to the beginning of the list
   virtual void      addRear(int &_node_arr[]);                     // add a new "native" node to the end of the list
   virtual int       removeFront(void);                             // delete the "native" node from the beginning of the list
   virtual int       removeRear(void);                              // delete the "native" node from the end of the list
   virtual void      deleteNodeByIndex(const uint _idx);            // delete the "native" ith node from the list
   virtual CiSingleNode *newNode(int &_node_arr[]);                 // new "native" node
  };
在 CiUnrollDoubleList.mqh 中提供了完整的類方法定義。
讓我們運行腳本 test_UdList.mq5 以檢查類方法的操作。在這里,節點操作與在前面的腳本中使用的操作類似。或許我們應該對排序和打印方法多說幾句。排序方法按元素的數量排列節點,將含有最小值數組的節點置於列表的最前面。
打印方法打印某個節點包含的數組值的字符串。
運行腳本之後,日誌將包含以下條目:
II      0       13:22:23        test_UdList (EURUSD,H1) =======List #1=======
FN      0       13:22:23        test_UdList (EURUSD,H1) List node #1, array: 55, 12, 1, 2, 11, 114, 33, 113, 14, 15, 16, 17, 18, 19, 20
OO      0       13:22:23        test_UdList (EURUSD,H1) List node #2, array: 11, 12, 13, 14, 15, 16, 17, 18, 19, 20
GG      0       13:22:23        test_UdList (EURUSD,H1)
GP      0       13:22:23        test_UdList (EURUSD,H1)
GR      0       13:22:23        test_UdList (EURUSD,H1) =======List #2 before sorting=======
JO      0       13:22:23        test_UdList (EURUSD,H1) List node #1, array: 55, 12, 1, 2, 11, 114, 33, 113, 14, 15, 16, 17, 18, 19, 20
CH      0       13:22:23        test_UdList (EURUSD,H1) List node #2, array: 11, 12, 13, 14, 15, 16, 17, 18, 19, 20
CF      0       13:22:23        test_UdList (EURUSD,H1) List node #3, array: -89, -131, -141, -139, -129, -25, -105, -24, -122, -120, -118, -116, -114, -112, -110
GD      0       13:22:23        test_UdList (EURUSD,H1)
GQ      0       13:22:23        test_UdList (EURUSD,H1)
LJ      0       13:22:23        test_UdList (EURUSD,H1) =======List #2 after sorting=======
FN      0       13:22:23        test_UdList (EURUSD,H1) List node #1, array: 11, 12, 13, 14, 15, 16, 17, 18, 19, 20
CJ      0       13:22:23        test_UdList (EURUSD,H1) List node #2, array: 55, 12, 1, 2, 11, 114, 33, 113, 14, 15, 16, 17, 18, 19, 20
II      0       13:22:23        test_UdList (EURUSD,H1) List node #3, array: -89, -131, -141, -139, -129, -25, -105, -24, -122, -120, -118, -116, -114, -112, -110
MD      0       13:22:23        test_UdList (EURUSD,H1)
MQ      0       13:22:23        test_UdList (EURUSD,H1)
如您所見,在排序之後,udList2 列表的打印順序是從含有最小數組的節點開始,直到含有最大數組的節點。
2.7 循環雙向鏈表
盡管非線性列表不在本文的討論範圍之內,我建議我們也處理此類列表。前文已經顯示了如何以循環方式鏈接節點(圖 3)。
讓我們創建 CiCircleDoubleList 類的一個模型(圖 13)。這個類是 CDoubleList 類的派生類。

圖 13 CiCircleDoubleList 類模型
由於這個列表中的節點是特殊字符(頭尾相鏈),來源基類 CiSingleList 的幾乎全部方法都必須是虛擬的。
//+------------------------------------------------------------------+
//|                      CiCircleDoubleList class                    |
//+------------------------------------------------------------------+
class CiCircleDoubleList : public CDoubleList
  {
public:
   void              CiCircleDoubleList(void);                       // default constructor
   void              CiCircleDoubleList(int _node_val);              // parameterized constructor
   void             ~CiCircleDoubleList(void){TRACE_CALL(_t_flag)};  // destructor
   //---
   virtual uint      Size(void) const;                                        // list size
   virtual bool      SetNodeByIndex(CiSingleNode *_new_node,const uint _idx); // insert the new ith node in the list
   virtual int       GetValByIndex(const uint _idx) const;           // value of the ith node in the list
   virtual CiSingleNode *GetNodeByIndex(const uint _idx) const;      // get the ith node in the list
   virtual bool      Find(const int _node_val) const;                // find the required value
   virtual bool      CopyByValue(const CiSingleList &_sList);        // copy the list by values

protected:
   virtual void      addFront(int _node_val);                        // add a new "native" node to the beginning of the list
   virtual void      addRear(int _node_val);                         // add a new "native" node to the end of the list
   virtual int       removeFront(void);                              // delete the "native" head node
   virtual int       removeRear(void);                               // delete the "native" tail node
   virtual void      deleteNodeByIndex(const uint _idx);             // delete the "native" ith node from the list

protected:
   void              CalcSize(void) const;                           // calculate the list size
   void              LinkHeadTail(void);                             // link head to tail
  };
在 CiCircleDoubleList.mqh 中提供了完整的類描述。
讓我們研究一下 CSnakeGame 類的某些方法。CiCircleDoubleList::LinkHeadTail() 方法將尾節點鏈接到頭節點。當出現新的尾節點或頭節點,並且前一鏈接丟失時,應調用該方法。
//+------------------------------------------------------------------+
//|                  Linking head to tail                            |
//+------------------------------------------------------------------+
void CiCircleDoubleList::LinkHeadTail(void)
  {
   TRACE_CALL(_t_flag)
   this.m_head.SetPrevNode(this.m_tail);      // link head to tail
   this.m_tail.SetNextNode(this.m_head);      // link tail to head
  }
請想一想如果我們正在處理循環單向鏈表,這個方法會是什麼樣子。
例如,思考一下 CiCircleDoubleList::addFront() 方法。
//+------------------------------------------------------------------+
//|                New "native" node to the beginning of the list    |
//+------------------------------------------------------------------+
void CiCircleDoubleList::addFront(int _node_val)
  {
   TRACE_CALL(_t_flag)
   CDoubleList::addFront(_node_val); // call a similar method of the base class
   this.LinkHeadTail();              // link head and tail
  }
您可以看到,在方法的主體中調用了基類 CDoubleList 的類似方法。此時,如果它並不是針對一件事情的,則我們會完成方法操作(在這里,基本上不需要此類方法)。頭節點和尾節點之間的鏈接丟失,並且在沒有該鏈接的情況下,列表不能循環鏈接。這是我們必須調用鏈接頭節點和尾節點的方法的原因之所在。
在腳本 test_UdList.mq5 檢查了對循環雙向鏈表的處理。
就任務和目標而言,使用的其他方法與前面的例子是相同的。
因此,日誌包含以下條目:
PR      0       13:34:29        test_CdList (EURUSD,H1) =======List #1=======
QS      0       13:34:29        test_CdList (EURUSD,H1) Node #1, val=14
QI      0       13:34:29        test_CdList (EURUSD,H1) Node #2, val=666
LQ      0       13:34:29        test_CdList (EURUSD,H1) Node #3, val=13
OH      0       13:34:29        test_CdList (EURUSD,H1) Node #4, val=11
DP      0       13:34:29        test_CdList (EURUSD,H1)
DK      0       13:34:29        test_CdList (EURUSD,H1)
DI      0       13:34:29        test_CdList (EURUSD,H1) =======List #2 before sorting=======
MS      0       13:34:29        test_CdList (EURUSD,H1) Node #1, val=38
IJ      0       13:34:29        test_CdList (EURUSD,H1) Node #2, val=37
IQ      0       13:34:29        test_CdList (EURUSD,H1) Node #3, val=36
EH      0       13:34:29        test_CdList (EURUSD,H1) Node #4, val=35
EO      0       13:34:29        test_CdList (EURUSD,H1) Node #5, val=34
FF      0       13:34:29        test_CdList (EURUSD,H1) Node #6, val=14
DN      0       13:34:29        test_CdList (EURUSD,H1) Node #7, val=666
GD      0       13:34:29        test_CdList (EURUSD,H1) Node #8, val=13
JK      0       13:34:29        test_CdList (EURUSD,H1) Node #9, val=11
JM      0       13:34:29        test_CdList (EURUSD,H1)
JH      0       13:34:29        test_CdList (EURUSD,H1)
MS      0       13:34:29        test_CdList (EURUSD,H1) =======List #2 after sorting=======
LE      0       13:34:29        test_CdList (EURUSD,H1) Node #1, val=11
KL      0       13:34:29        test_CdList (EURUSD,H1) Node #2, val=13
QS      0       13:34:29        test_CdList (EURUSD,H1) Node #3, val=14
NJ      0       13:34:29        test_CdList (EURUSD,H1) Node #4, val=34
NQ      0       13:34:29        test_CdList (EURUSD,H1) Node #5, val=35
NH      0       13:34:29        test_CdList (EURUSD,H1) Node #6, val=36
NO      0       13:34:29        test_CdList (EURUSD,H1) Node #7, val=37
NF      0       13:34:29        test_CdList (EURUSD,H1) Node #8, val=38
JN      0       13:34:29        test_CdList (EURUSD,H1) Node #9, val=666
RJ      0       13:34:29        test_CdList (EURUSD,H1)
RE      0       13:34:29        test_CdList (EURUSD,H1)
這樣,所介紹的列表類之間的最終繼承關系圖如下所示(圖 14)。
我不確定是否所有的類都需要通過繼承關聯在一起,但是我決定讓所有的類都如此。

圖 14 列表類之間的繼承
本文的這一節說明了自定義列表,我要指出,我們幾乎未曾談到非線性列表組、多鏈接鏈表 (multiply linked list) 等。當我收集到相關信息並獲得處理此類動態數據結構的更多經驗時,我將嘗試撰寫另一篇文章。
3. MQL5 標準庫中的列表
讓我們看一看可在標準庫中找到的列表類(圖 15)。
它屬於數據類。

圖 15 CList 類模型
說也奇怪,CList 是 CObject 類的派生類,即列表繼承該節點類的數據和方法。
列表類包含一組令人印象深刻的方法。老實說,我並不期待在標準庫中找到如此之大的類。
CList 類有 8 個數據成員。我要指出某些事項。類屬性包含當前節點的索引 (int m_curr_idx) 和指向當前節點的指針 (CObject* m_curr_node)。可以說列表很“聰明” - 它能夠指出在哪里對控制進行本地化。此外,它具有內存管理機制(我們可以實際刪除節點,或僅僅是從列表排除該節點)、排序列表標記和排序模式。
至於方法,CList 類的所有方法都可以分為以下的組別:
- 屬性;
- 創建方法;
- 添加方法;
- 刪除方法;
- 導航;
- 排序方法;
- 比較方法;
- 搜索方法;
- 輸入/輸出。
如通常一樣,有一個標準構造函數和一個析構函數。
第一個函數清空 (NULL) 所有指針。內存管理標記狀態設置為刪除。新列表是不排序的。
在其主體中,析構函數僅調用 Clear() 方法來清空節點的列表。列表末尾的存在並不是一定伴隨着其元素(節點)的“死亡”。因此,在刪除列表元素時設置的內存管理標記將類關系從組合轉為聚合。
我們可以使用 set- 和 get- 方法 FreeMode() 處理此標記。
類有兩種能夠用於擴展列表的方法:Add() 和 Insert()。第一種方法與本文第一節中使用的 AddRear() 方法類似。第二種方法與 SetNodeByIndex() 方法類似。
讓我們以一個小例子開始。首先,我們需要創建一個 CNodeInt 節點類,該類是接口類 CObject 的派生類。它存儲整數類型的值。
//+------------------------------------------------------------------+
//|                        CNodeInt class                            |
//+------------------------------------------------------------------+
class  CNodeInt : public CObject
  {
private:
   int               m_val;  // node data

public:
   void              CNodeInt(void){this.m_val=WRONG_VALUE;}; // default constructor
   void              CNodeInt(int _val);                      // parameterized constructor
   void             ~CNodeInt(void){};                        // destructor
   int               GetVal(void){return this.m_val;};        // get-method for node data
   void              SetVal(int _val){this.m_val=_val;};      // set-method for node data
  };
//+------------------------------------------------------------------+
//|                    Parameterized constructor                     |
//+------------------------------------------------------------------+
void CNodeInt::CNodeInt(int _val):m_val(_val)
  {

  };
我們將在腳本 test_MQL5_List.mq5 中處理 CList 列表。
示例 1 說明了列表和節點的動態創建。然後,用節點填充列表,並在刪除列表之前和之後檢查第一個節點的值。
//--- Example 1 (testing memory management)
   CList *myList=new CList;
// myList.FreeMode(false);  // reset flag
   bool _free_mode=myList.FreeMode();
   PrintFormat("\nList \"myList\" - memory management flag: %d",_free_mode);
   CNodeInt *p_new_nodes_int[10];
   p_new_nodes_int[0]=NULL;
   for(int i=0;i<ArraySize(p_new_nodes_int);i++)
     {
      p_new_nodes_int[i]=new CNodeInt(rand());
      myList.Add(p_new_nodes_int[i]);
     }
   PrintFormat("List \"myList\" has as many nodes as: %d",myList.Total());
   Print("=======Before deleting \"myList\"=======");
   PrintFormat("The 1st node value is: %d",p_new_nodes_int[0].GetVal());
   delete myList;
   int val_to_check=WRONG_VALUE;
   if(CheckPointer(p_new_nodes_int[0]))
      val_to_check=p_new_nodes_int[0].GetVal();
   Print("=======After deleting \"myList\"=======");
   PrintFormat("The 1st node value is: %d",val_to_check);
如果重設標記的字符串保持為在前面加有注釋符號(不活動),則我們將在日誌中得到以下條目:
GS      0       14:00:16        test_MQL5_List (EURUSD,H1)
EO      0       14:00:16        test_MQL5_List (EURUSD,H1)      List "myList" - memory management flag: 1
FR      0       14:00:16        test_MQL5_List (EURUSD,H1)      List "myList" has as many nodes as: 10
JH      0       14:00:16        test_MQL5_List (EURUSD,H1)      =======Before deleting "myList"=======
DO      0       14:00:16        test_MQL5_List (EURUSD,H1)      The 1st node value is: 7189
KJ      0       14:00:16        test_MQL5_List (EURUSD,H1)      =======After deleting "myList"=======
QK      0       14:00:16        test_MQL5_List (EURUSD,H1)      The 1st node value is: -1
請注意,在動態刪除 myList 列表之後,也會從內存刪除其中的所有節點。
然而,如果我們取消重置標記字符串的注釋:
// myList.FreeMode(false); // reset flag則輸出到日誌的條目將顯示如下:
NS      0       14:02:11        test_MQL5_List (EURUSD,H1)
CN      0       14:02:11        test_MQL5_List (EURUSD,H1)      List "myList" - memory management flag: 0
CS      0       14:02:11        test_MQL5_List (EURUSD,H1)      List "myList" has as many nodes as: 10
KH      0       14:02:11        test_MQL5_List (EURUSD,H1)      =======Before deleting "myList"=======
NL      0       14:02:11        test_MQL5_List (EURUSD,H1)      The 1st node value is: 20411
HJ      0       14:02:11        test_MQL5_List (EURUSD,H1)      =======After deleting "myList"=======
LI      0       14:02:11        test_MQL5_List (EURUSD,H1)      The 1st node value is: 20411
QQ      1       14:02:11        test_MQL5_List (EURUSD,H1)      10 undeleted objects left
DD      1       14:02:11        test_MQL5_List (EURUSD,H1)      10 objects of type CNodeInt left
DL      1       14:02:11        test_MQL5_List (EURUSD,H1)      400 bytes of leaked memory
很容易注意到,在刪除列表之前和之後,頭節點的值保持不變。在這種情形下,如果腳本不包含正確刪除它們的代碼,則仍然會有未被刪除的對象留下來。
現在,讓我們嘗試處理排序方法。
//--- Example 2 (sorting)

   CList *myList=new CList;
   CNodeInt *p_new_nodes_int[10];
   p_new_nodes_int[0]=NULL;
   for(int i=0;i<ArraySize(p_new_nodes_int);i++)
     {
      p_new_nodes_int[i]=new CNodeInt(rand());
      myList.Add(p_new_nodes_int[i]);
     }
   PrintFormat("\nList \"myList\" has as many nodes as: %d",myList.Total());
   Print("=======List \"myList\" before sorting=======");
   for(int i=0;i<myList.Total();i++)
     {
      CNodeInt *p_node_int=myList.GetNodeAtIndex(i);
      int node_val=p_node_int.GetVal();
      PrintFormat("Node #%d is equal to: %d",i+1,node_val);
     }
   myList.Sort(0);
   Print("\n=======List \"myList\" after sorting=======");
   for(int i=0;i<myList.Total();i++)
     {
      CNodeInt *p_node_int=myList.GetNodeAtIndex(i);
      int node_val=p_node_int.GetVal();
      PrintFormat("Node #%d is equal to: %d",i+1,node_val);
     }
   delete myList;
因此,日誌包含以下條目:
OR      0       22:47:01        test_MQL5_List (EURUSD,H1)
FN      0       22:47:01        test_MQL5_List (EURUSD,H1)      List "myList" has as many nodes as: 10
FH      0       22:47:01        test_MQL5_List (EURUSD,H1)      =======List "myList" before sorting=======
LG      0       22:47:01        test_MQL5_List (EURUSD,H1)      Node #1 is equal to: 30511
CO      0       22:47:01        test_MQL5_List (EURUSD,H1)      Node #2 is equal to: 17404
GF      0       22:47:01        test_MQL5_List (EURUSD,H1)      Node #3 is equal to: 12215
KQ      0       22:47:01        test_MQL5_List (EURUSD,H1)      Node #4 is equal to: 31574
NJ      0       22:47:01        test_MQL5_List (EURUSD,H1)      Node #5 is equal to: 7285
HP      0       22:47:01        test_MQL5_List (EURUSD,H1)      Node #6 is equal to: 23509
IH      0       22:47:01        test_MQL5_List (EURUSD,H1)      Node #7 is equal to: 26991
NS      0       22:47:01        test_MQL5_List (EURUSD,H1)      Node #8 is equal to: 414
MK      0       22:47:01        test_MQL5_List (EURUSD,H1)      Node #9 is equal to: 18824
DR      0       22:47:01        test_MQL5_List (EURUSD,H1)      Node #10 is equal to: 1560
OR      0       22:47:01        test_MQL5_List (EURUSD,H1)
OM      0       22:47:01        test_MQL5_List (EURUSD,H1)      =======List "myList" after sorting=======
QM      0       22:47:01        test_MQL5_List (EURUSD,H1)      Node #1 is equal to: 26991
RE      0       22:47:01        test_MQL5_List (EURUSD,H1)      Node #2 is equal to: 23509
ML      0       22:47:01        test_MQL5_List (EURUSD,H1)      Node #3 is equal to: 18824
DD      0       22:47:01        test_MQL5_List (EURUSD,H1)      Node #4 is equal to: 414
LL      0       22:47:01        test_MQL5_List (EURUSD,H1)      Node #5 is equal to: 1560
IG      0       22:47:01        test_MQL5_List (EURUSD,H1)      Node #6 is equal to: 17404
PN      0       22:47:01        test_MQL5_List (EURUSD,H1)      Node #7 is equal to: 30511
II      0       22:47:01        test_MQL5_List (EURUSD,H1)      Node #8 is equal to: 31574
OQ      0       22:47:01        test_MQL5_List (EURUSD,H1)      Node #9 is equal to: 12215
JH      0       22:47:01        test_MQL5_List (EURUSD,H1)      Node #10 is equal to: 7285
即使任何排序都已完成,排序技術對我而言仍然是神秘的。我將解釋這是為什麼。在沒有詳細探討調用順序的情況下,CList::Sort() 方法調用虛擬方法 CObject::Compare(),該方法沒有在基類中以任何方式實施。因此,編程者必須自己處理排序方法的實施。
現在,讓我就 Total() 方法說幾句。它返回數據成員 m_data_total 負責的元素(節點)的數量。這是一種非常簡明的方法。這種實施中的元素計數將比我以前提出的方法快很多。事實上,為什麼每次遍曆列表和計數節點,盡管添加或刪除節點時可以設置列表中節點的精確數量?
示例 3 比較了 CList 和 CiSingleList 類型的列表填充速度並計算了獲得每個列表的大小所用的時間。
//--- Example 3 (nodes number)

   int iterations=1e7;   // 10 million iterations
//--- the new CList
   CList *p_mql_List=new CList;
   uint start=GetTickCount(); // starting value
   for(int i=0;i<iterations;i++)
     {
      CNodeInt *p_node_int=new CNodeInt(rand());
      p_mql_List.Add(p_node_int);
     }
   uint time=GetTickCount()-start; // time spent, msec
   Print("\n=======the CList type list=======");
   PrintFormat("Filling the list of %.3e nodes has taken %d msec",iterations,time);
//--- get the size
   start=GetTickCount();
   int list_size=p_mql_List.Total();
   time=GetTickCount()-start;
   PrintFormat("Getting the size of the list has taken %d msec",time);

   delete p_mql_List;

//---  the new CiSingleList
   CiSingleList *p_sList=new CiSingleList;

   start=GetTickCount(); // starting value
   for(int i=0;i<iterations;i++)
      p_sList.AddRear(rand());
   time=GetTickCount()-start; // time spent, msec
   Print("\n=======the CiSingleList type list=======");
   PrintFormat("Filling the list of %.3e nodes has taken %d msec",iterations,time);
//--- get the size
   start=GetTickCount();
   list_size=(int)p_sList.Size();
   time=GetTickCount()-start;
   PrintFormat("Getting the size of the list has taken %d msec",time);
   delete p_sList;
日誌中的結果如下所示:
KO      0       22:48:24        test_MQL5_List (EURUSD,H1)
CK      0       22:48:24        test_MQL5_List (EURUSD,H1)      =======the CList type list=======
JL      0       22:48:24        test_MQL5_List (EURUSD,H1)      Filling the list of 1.000e+007 nodes has taken 2606 msec
RO      0       22:48:24        test_MQL5_List (EURUSD,H1)      Getting the size of the list has taken 0 msec
LF      0       22:48:29        test_MQL5_List (EURUSD,H1)
EL      0       22:48:29        test_MQL5_List (EURUSD,H1)      =======the CiSingleList type list=======
KK      0       22:48:29        test_MQL5_List (EURUSD,H1)      Filling the list of 1.000e+007 nodes has taken 2356 msec
NF      0       22:48:29        test_MQL5_List (EURUSD,H1)      Getting the size of the list has taken 359 msec
獲取大小的方法在 CList 列表中即時有效。通過這種方式,向列表添加節點也很快速。
在下一代碼塊(示例 4)中,我建議注意列表作為數據容器的一個主要不利方面 - 訪問元素的速度。問題在於列表元素是線性訪問的。在 CList 類中,以二元方式訪問元素,這稍微降低了算法的勞動強度。
進行線性搜索時,勞動強度為 O(N)。以二元方式實施的搜索讓勞動強度變為 log2(N)。
以下是訪問數據集元素的代碼的一個例子:
//--- Example 4 (speed of accessing the node)

   const uint Iter_arr[]={1e3,3e3,6e3,9e3,1e4,3e4,6e4,9e4,1e5,3e5,6e5};
   for(uint i=0;i<ArraySize(Iter_arr);i++)
     {
      const uint cur_iterations=Iter_arr[i]; // iterations number
      uint randArr[];                        // array of random numbers
      uint idxArr[];                         // array of indexes
      //--- set the arrays size
      ArrayResize(randArr,cur_iterations);
      ArrayResize(idxArr,cur_iterations);
      CRandom myRand;                        // random number generator
      //--- fill the array of random numbers
      for(uint t=0;t<cur_iterations;t++)
         randArr[t]=myRand.int32();
      //--- fill the array of indexes with random numbers (from 0 to 10 million)
      int iter_log10=(int)log10(cur_iterations);
      for(uint r=0;r<cur_iterations;r++)
        {
         uint rand_val=myRand.int32(); // random value (from 0 to 4 294 967 295)
         if(rand_val>=cur_iterations)
           {
            int val_log10=(int)log10(rand_val);
            double log10_remainder=val_log10-iter_log10;
            rand_val/=(uint)pow(10,log10_remainder+1);
           }
         //--- check the limit
         if(rand_val>=cur_iterations)
           {
            Alert("Random value error!");
            return;
           }
         idxArr[r]=rand_val;
        }
      //--- time spent for the array
      uint start=GetTickCount();
      //--- accessing the array elements
      for(uint p=0;p<cur_iterations;p++)
         uint random_val=randArr[idxArr[p]];

      uint time=GetTickCount()-start; // time spent, msec
      Print("\n=======the uint type array=======");
      PrintFormat("Random accessing the array of elements %.1e has taken %d msec",cur_iterations,time);

      //--- the CList type list
      CList *p_mql_List=new CList;
      //--- fill the list
      for(uint q=0;q<cur_iterations;q++)
        {
         CNodeInt *p_node_int=new CNodeInt(randArr[q]);
         p_mql_List.Add(p_node_int);
        }
      start=GetTickCount();
      //--- accessing the list nodes
      for(uint w=0;w<cur_iterations;w++)
         CNodeInt *p_node_int=p_mql_List.GetNodeAtIndex(idxArr[w]);
      time=GetTickCount()-start; // time spent, msec
      Print("\n=======the CList type list=======");
      PrintFormat("Random accessing the list of nodes %.1e has taken %d msec",cur_iterations,time);

      //--- free the memory
      ArrayFree(randArr);
      ArrayFree(idxArr);
      delete p_mql_List;
     }
基於塊操作結果,以下條目被打印到日誌:
MR      0       22:51:22        test_MQL5_List (EURUSD,H1)
QL      0       22:51:22        test_MQL5_List (EURUSD,H1)      =======the uint type array=======
IG      0       22:51:22        test_MQL5_List (EURUSD,H1)      Random accessing the array of elements 1.0e+003 has taken 0 msec
QF      0       22:51:22        test_MQL5_List (EURUSD,H1)
IQ      0       22:51:22        test_MQL5_List (EURUSD,H1)      =======the CList type list=======
JK      0       22:51:22        test_MQL5_List (EURUSD,H1)      Random accessing the list of nodes 1.0e+003 has taken 0 msec
MJ      0       22:51:22        test_MQL5_List (EURUSD,H1)
QD      0       22:51:22        test_MQL5_List (EURUSD,H1)      =======the uint type array=======
GO      0       22:51:22        test_MQL5_List (EURUSD,H1)      Random accessing the array of elements 3.0e+003 has taken 0 msec
QN      0       22:51:22        test_MQL5_List (EURUSD,H1)
II      0       22:51:22        test_MQL5_List (EURUSD,H1)      =======the CList type list=======
EP      0       22:51:22        test_MQL5_List (EURUSD,H1)      Random accessing the list of nodes 3.0e+003 has taken 16 msec
OR      0       22:51:22        test_MQL5_List (EURUSD,H1)
OL      0       22:51:22        test_MQL5_List (EURUSD,H1)      =======the uint type array=======
FG      0       22:51:22        test_MQL5_List (EURUSD,H1)      Random accessing the array of elements 6.0e+003 has taken 0 msec
CF      0       22:51:22        test_MQL5_List (EURUSD,H1)
GQ      0       22:51:22        test_MQL5_List (EURUSD,H1)      =======the CList type list=======
CH      0       22:51:22        test_MQL5_List (EURUSD,H1)      Random accessing the list of nodes 6.0e+003 has taken 31 msec
QJ      0       22:51:22        test_MQL5_List (EURUSD,H1)
MD      0       22:51:22        test_MQL5_List (EURUSD,H1)      =======the uint type array=======
MO      0       22:51:22        test_MQL5_List (EURUSD,H1)      Random accessing the array of elements 9.0e+003 has taken 0 msec
EN      0       22:51:22        test_MQL5_List (EURUSD,H1)
MJ      0       22:51:22        test_MQL5_List (EURUSD,H1)      =======the CList type list=======
CP      0       22:51:22        test_MQL5_List (EURUSD,H1)      Random accessing the list of nodes 9.0e+003 has taken 47 msec
CR      0       22:51:22        test_MQL5_List (EURUSD,H1)
KL      0       22:51:22        test_MQL5_List (EURUSD,H1)      =======the uint type array=======
JG      0       22:51:22        test_MQL5_List (EURUSD,H1)      Random accessing the array of elements 1.0e+004 has taken 0 msec
GF      0       22:51:22        test_MQL5_List (EURUSD,H1)
KR      0       22:51:22        test_MQL5_List (EURUSD,H1)      =======the CList type list=======
MK      0       22:51:22        test_MQL5_List (EURUSD,H1)      Random accessing the list of nodes 1.0e+004 has taken 343 msec
GJ      0       22:51:22        test_MQL5_List (EURUSD,H1)
GG      0       22:51:22        test_MQL5_List (EURUSD,H1)      =======the uint type array=======
LO      0       22:51:22        test_MQL5_List (EURUSD,H1)      Random accessing the array of elements 3.0e+004 has taken 0 msec
QO      0       22:51:24        test_MQL5_List (EURUSD,H1)
MJ      0       22:51:24        test_MQL5_List (EURUSD,H1)      =======the CList type list=======
NP      0       22:51:24        test_MQL5_List (EURUSD,H1)      Random accessing the list of nodes 3.0e+004 has taken 1217 msec
OS      0       22:51:24        test_MQL5_List (EURUSD,H1)
KO      0       22:51:24        test_MQL5_List (EURUSD,H1)      =======the uint type array=======
CP      0       22:51:24        test_MQL5_List (EURUSD,H1)      Random accessing the array of elements 6.0e+004 has taken 0 msec
MG      0       22:51:26        test_MQL5_List (EURUSD,H1)
ER      0       22:51:26        test_MQL5_List (EURUSD,H1)      =======the CList type list=======
PG      0       22:51:26        test_MQL5_List (EURUSD,H1)      Random accessing the list of nodes 6.0e+004 has taken 2387 msec
GK      0       22:51:26        test_MQL5_List (EURUSD,H1)
OG      0       22:51:26        test_MQL5_List (EURUSD,H1)      =======the uint type array=======
NH      0       22:51:26        test_MQL5_List (EURUSD,H1)      Random accessing the array of elements 9.0e+004 has taken 0 msec
JO      0       22:51:30        test_MQL5_List (EURUSD,H1)
NK      0       22:51:30        test_MQL5_List (EURUSD,H1)      =======the CList type list=======
KO      0       22:51:30        test_MQL5_List (EURUSD,H1)      Random accessing the list of nodes 9.0e+004 has taken 3619 msec
HS      0       22:51:30        test_MQL5_List (EURUSD,H1)
DN      0       22:51:30        test_MQL5_List (EURUSD,H1)      =======the uint type array=======
RP      0       22:51:30        test_MQL5_List (EURUSD,H1)      Random accessing the array of elements 1.0e+005 has taken 0 msec
OD      0       22:52:05        test_MQL5_List (EURUSD,H1)
GS      0       22:52:05        test_MQL5_List (EURUSD,H1)      =======the CList type list=======
DE      0       22:52:05        test_MQL5_List (EURUSD,H1)      Random accessing the list of nodes 1.0e+005 has taken 35631 msec
NH      0       22:52:06        test_MQL5_List (EURUSD,H1)
RF      0       22:52:06        test_MQL5_List (EURUSD,H1)      =======the uint type array=======
FI      0       22:52:06        test_MQL5_List (EURUSD,H1)      Random accessing the array of elements 3.0e+005 has taken 0 msec
HL      0       22:54:20        test_MQL5_List (EURUSD,H1)
PD      0       22:54:20        test_MQL5_List (EURUSD,H1)      =======the CList type list=======
FN      0       22:54:20        test_MQL5_List (EURUSD,H1)      Random accessing the list of nodes 3.0e+005 has taken 134379 msec
RQ      0       22:54:20        test_MQL5_List (EURUSD,H1)
JI      0       22:54:20        test_MQL5_List (EURUSD,H1)      =======the uint type array=======
MR      0       22:54:20        test_MQL5_List (EURUSD,H1)      Random accessing the array of elements 6.0e+005 has taken 15 msec
NE      0       22:58:48        test_MQL5_List (EURUSD,H1)
FL      0       22:58:48        test_MQL5_List (EURUSD,H1)      =======the CList type list=======
GE      0       22:58:48        test_MQL5_List (EURUSD,H1)      Random accessing the list of nodes 6.0e+005 has taken 267589 msec
您可以看到,隨着列表大小的增加,隨機訪問列表元素用的時間也增加(圖 16)。

圖 16 隨機訪問數組和列表元素所用的時間
現在,讓我們討論用於存儲和加載數據的方法。
基礎列表類 CList 包含此類方法,但它們是虛擬的。因此,為了使用一個例子測試它們的運行,我們需要做一些準備。
我們應使用派生類 CIntList 繼承 CList 類的能力。後者只有 1 個方法用於創建新的元素 CIntList::CreateElement()。
//+------------------------------------------------------------------+
//|                      CIntList class                              |
//+------------------------------------------------------------------+
class CIntList : public CList
  {

public:
   virtual CObject *CreateElement(void);
  };
//+------------------------------------------------------------------+
//|                    New element of the list                       |
//+------------------------------------------------------------------+
CObject *CIntList::CreateElement(void)
  {
   CObject *new_node=new CNodeInt();
   return new_node;
  }
我們還需要向派生節點類型 CNodeInt 添加虛擬方法 CNodeInt::Save() 和 CNodeInt::Load()。將從成員函數 CList::Save() 和 CList::Load() 分別調用它們。
結果,示例如下所示(圖 5):
//--- Example 5 (saving list data)
//--- the CIntList type list
   CList *p_int_List=new CIntList;
   int randArr[1000];                        // array of random numbers
   ArrayInitialize(randArr,0);
//--- fill the array of random numbers
   for(int t=0;t<1000;t++)
      randArr[t]=(int)myRand.int32();
//--- fill the list
   for(uint q=0;q<1000;q++)
     {
      CNodeInt *p_node_int=new CNodeInt(randArr[q]);
      p_int_List.Add(p_node_int);
     }
//--- save the list to the file
   int  file_ha=FileOpen("List_data.bin",FILE_WRITE|FILE_BIN);
   p_int_List.Save(file_ha);
   FileClose(file_ha);
   p_int_List.FreeMode(true);
   p_int_List.Clear();
//--- load the list from the file
   file_ha=FileOpen("List_data.bin",FILE_READ|FILE_BIN);
   p_int_List.Load(file_ha);
   int Loaded_List_size=p_int_List.Total();
   PrintFormat("Nodes loaded from the file: %d",Loaded_List_size);
//--- free the memory
   delete p_int_List;
在圖表上運行腳本之後,以下條目將被添加到日誌:
ND 0 11:59:35 test_MQL5_List (EURUSD,H1) As many as 1000 nodes loaded from the file.
這樣,我們已經探討了 CNodeInt 節點類型的數據成員的輸入/輸出方法的實施。
在下一節中,我們將探討在使用 MQL5 時如何使用列表解決問題的例子。
4. 在 MQL5 中使用列表的例子
在前一節中,我在討論標準庫類 CList 的方法時舉出了幾個例子。
現在,我將討論使用列表來解決具體問題的例子。在這里,我必須再一次指出列表作為容器數據類型的優點。我們可以通過充分利用列表的靈活性這一優勢來更加高效地處理代碼。
4.1 處理圖形對象
想象一下我們需要在圖表中以程序方式創建圖像對象。由於各種原因,可能有不同的對象出現在圖表中。
我記得列表曾經如何幫助我用圖形對象解決問題。我願意與您分享這個經曆。
我有一項按指定條件創建垂直線條的任務。按照條件,垂直線作為給定時間區間的界限,而時間區間的長度在每個案例中各有不同。據說,區間從來沒有完整的形成過。
我研究了 EMA21 的行為,並且為該目的而收集了統計數據。
我對移動平均線的坡長特別感興趣。例如,在向下運動中,通過記錄移動平均線的負運動(即值減小)來確定起點,並在該點畫一條垂直線。圖 17 顯示了為 EURUSD,H1 在 2013 年 9 月 5 日 16:00,在燭形建立時確定的這樣一個點。

圖 17 向下區間的第一個點
依據相反原則確定向下運動結束的第二個點 - 通過記錄移動平均線的正運動,即值增大(圖 18)。

圖 18 向下區間的第二個點
因此,目標區間是從 2013 年 9 月 5 日 16:00 至 2013 年 9 月 6 日 17:00。
確定不同區間的系統可能更複雜,也可能更簡單。這不是關鍵所在。重要的是這種處理圖形對象同時收集統計數據的技術涉及列表的一個主要優勢 - 組合的靈活性。
對於當前例子,我首先創建了一個 CVertLineNode 類型的節點,負責 2 個“垂直線”圖形對象。
類定義如下:
//+------------------------------------------------------------------+
//|                      CVertLineNode class                         |
//+------------------------------------------------------------------+
class CVertLineNode : public CObject
  {
private:
   SVertLineProperties m_vert_lines[2];      // array of structures of vertical line properties
   uint              m_duration;             // frame duration
   bool              m_IsFrameFormed;        // flag of frame formation

public:
   void              CVertLineNode(void);
   void             ~CVertLineNode(void){};
   //--- set-methods
   void              SetLine(const SVertLineProperties &_vert_line,bool IsFirst=true);
   void              SetDuration(const uint _duration){this.m_duration=_duration;};
   void              SetFrameFlag(const bool _frame_flag){this.m_IsFrameFormed=_frame_flag;};
   //--- get-methods
   void              GetLine(SVertLineProperties &_vert_line_out,bool IsFirst=true) const;
   uint              GetDuration(void) const;
   bool              GetFrameFlag(void) const;
   //--- draw the line
   bool              DrawLine(bool IsFirst=true) const;
  };
基本而言,此節點類型描述了一個框架(在這里解釋為兩條垂直線包含的若幹燭形)。用若幹垂直線屬性、持續時間和格式標記組成的結構表示框架界限。
除了標準構造函數和析構函數以外,類還有幾個 set- 和 get- 方法,以及用於在圖表上繪制線條的方法。
讓我提醒您,在我的例子中,垂直線條(框架)節點在出現表示向下運動開始的第一條垂直線以及表示向上運動開始的第二條垂直線時即可被視為已經形成。
使用腳本 Stat_collector.mq5,我在圖表中顯示了所有框架,並且統計了在過去的 2000 條柱中有多少個節點(框架)對應於某個持續時間。
為了說明,我創建了包含任意框架的 4 個列表。第一個列表包含最多 5 根燭形的框架,第二個列表包含最多 10 根燭形的框架,第三個列表包含最多 15 根燭形的框架,第四個列表包含燭形數量不限的框架。
NS      0       15:27:32        Stat_collector (EURUSD,H1)      =======List #1=======
RF      0       15:27:32        Stat_collector (EURUSD,H1)      Duration limit: 5
ML      0       15:27:32        Stat_collector (EURUSD,H1)      Nodes number: 65
HK      0       15:27:32        Stat_collector (EURUSD,H1)
OO      0       15:27:32        Stat_collector (EURUSD,H1)      =======List #2=======
RI      0       15:27:32        Stat_collector (EURUSD,H1)      Duration limit: 10
NP      0       15:27:32        Stat_collector (EURUSD,H1)      Nodes number: 15
RG      0       15:27:32        Stat_collector (EURUSD,H1)
FH      0       15:27:32        Stat_collector (EURUSD,H1)      =======List #3=======
GN      0       15:27:32        Stat_collector (EURUSD,H1)      Duration limit: 15
FG      0       15:27:32        Stat_collector (EURUSD,H1)      Nodes number: 6
FR      0       15:27:32        Stat_collector (EURUSD,H1)
CD      0       15:27:32        Stat_collector (EURUSD,H1)      =======List #4=======
PS      0       15:27:32        Stat_collector (EURUSD,H1)      Nodes number: 20
如此一來,我得到下圖(圖 19)。為方便起見,第二條垂直框架線以藍色顯示。
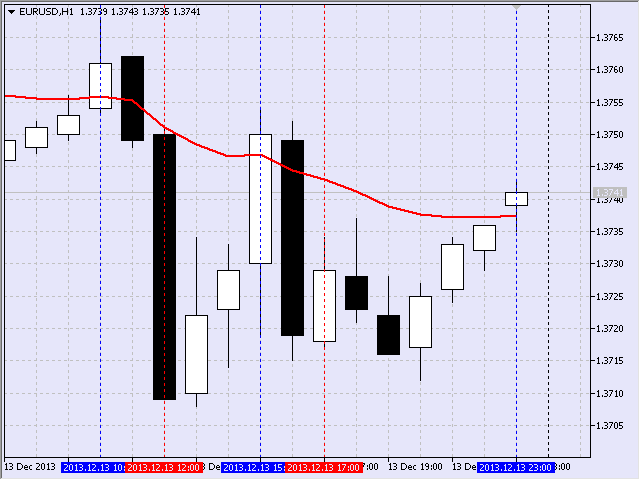
圖 19 顯示框架
說也奇怪,最後一個框架在 2013 年 12 月 13 日星期五的最後一小時形成。它屬於第二個列表,因為它的持續時間為 6 小時。
4.2 處理虛擬交易
想象一下,您需要創建一個 EA 交易程序,在一個價格變動中對一種金融工具實施幾種獨立的策略。顯然,在現實中,對於一種金融工具,一次只能實施一個策略。所有其他策略都將是虛擬的。那麼,只能出於測試和優化交易理念的目的來實施它。
在這里,我必須引用一篇基礎文章,該文一般性地詳細描述了與交易有關的基本概念,並且尤其與 MetaTrader 5 客戶端相關:"Orders, Positions and Deals in MetaTrader 5"(MetaTrader 5 中的訂單、倉位和成交)。
因此,如果在解決這個問題的過程中,我們使用 MetaTrader 5 環境中常用的交易概念、交易對象管理系統和交易對象信息存儲方法,則我們可能會想到創建一個虛擬數據庫。
讓我提醒您,開發人員將所有交易對象歸類為訂單、倉位、成交和曆史訂單。挑剔者可能注意到作者自己在這里使用了“交易對象”這一術語。這是千真萬確的......
我建議在虛擬交易中使用類似的方法並得到以下虛擬交易對象:虛擬訂單、虛擬倉位、虛擬成交和虛擬曆史訂單。
我認為這個主題值得深入且更加詳細的討論。同時,回到本文的主題,我要說容器數據類型,包括列表,在實施虛擬策略時會給編程者帶來便利。
考慮新的虛擬倉位,很自然,它不能在交易服務器端。這意味着其相關信息應保存在客戶端。在這里,可以用一個列表表示一個數據庫,該列表又包含幾個列表,其中一個列表將包含虛擬倉位節點。
使用開發人員的方法,將有以下用於虛擬交易的類:
類/組 |
說明 |
CVirtualOrder |
處理虛擬掛單的類 |
CVirtualHistoryOrder |
處理虛擬“曆史”訂單的類 |
CVirtualPosition |
處理虛擬未平倉位的類 |
CVirtualDeal |
處理虛擬“曆史”成交的類 |
CVirtualTrade |
執行虛擬交易操作的類 |
表 1. 用於虛擬交易的類
我不會討論任何虛擬交易類的組合。但是它很可能包含標準交易類的全部或幾乎全部方法。我只是想指出開發人員使用的不是指定交易對象本身的一個類,而是其屬性的一個類。
為了在您的算法中使用列表,您也需要節點。因此,我們需要在一個節點中打包虛擬交易對象的類。
假定虛擬未平倉位節點是 CVirtualPositionNode 類型。此類型的定義最初如下所示:
//+------------------------------------------------------------------+
//|                Class CVirtualPositionNode                        |
//+------------------------------------------------------------------+
class CVirtualPositionNode : public CObject
  {
protected:
   CVirtualPositionNode *m_virt_position;         // pointer to the virtual function

public:
   void              CVirtualPositionNode(void);  // default constructor
   void             ~CVirtualPositionNode(void);  // destructor
  };
現在,當建立了虛擬倉位時,它可以被添加到虛擬倉位列表中。
我也要指出,處理虛擬交易對象的這種方法不需要使用緩存,因為數據庫存儲在隨機存取存儲器中。當然,您也可以安排將其存儲在其他存儲介質中。
總結
在本文中,我力圖說明容器數據類型,例如列表的優點。但是我也必須指出其缺點。無論如何,我希望這些信息能夠幫助那些對面向對象編程進行一般性研究的人,尤其是那些具體研究其多態性(基礎原理之一)的人。
文件位置:
以我的觀點,最好在項目文件夾中創建和存儲文件。例如,如下所示:%MQL5\Projects\UserLists。這是我保存所有源代碼文件的地方。如果您使用默認目錄,則您需要在某些文件的代碼中更改包含文件指定方法(用尖括號代替引號)。
| # | 文件 | 位置 | 說明 |
|---|---|---|---|
| 1 | CiSingleNode.mqh | %MQL5\Projects\UserLists | 單向鏈表節點類 |
| 2 | CDoubleNode.mqh | %MQL5\Projects\UserLists | 雙向鏈表節點類 |
| 3 | CiUnrollDoubleNode.mqh | %MQL5\Projects\UserLists | 松散雙向鏈表節點類 |
| 4 | test_nodes.mq5 | %MQL5\Projects\UserLists | 含有節點處理例子的腳本 |
| 5 | CiSingleList.mqh | %MQL5\Projects\UserLists | 單向鏈表類 |
| 6 | CDoubleList.mqh | %MQL5\Projects\UserLists | 雙向鏈表類 |
| 7 | CiUnrollDoubleList.mqh | %MQL5\Projects\UserLists | 松散雙向鏈表類 |
| 8 | CiCircleDoublList.mqh | %MQL5\Projects\UserLists | 循環雙向鏈表類 |
| 9 | test_sList.mq5 | %MQL5\Projects\UserLists | 含有單向鏈表處理例子的腳本 |
| 10 | test_dList.mq5 | %MQL5\Projects\UserLists | 含有雙向鏈表處理例子的腳本 |
| 11 | test_UdList.mq5 | %MQL5\Projects\UserLists | 含有松散雙向鏈表處理例子的腳本 |
| 12 | test_CdList.mq5 | %MQL5\Projects\UserLists | 含有循環雙向鏈表處理例子的腳本 |
| 13 | test_MQL5_List.mq5 | %MQL5\Projects\UserLists | 含有 CList 類處理例子的腳本 |
| 14 | CNodeInt.mqh | %MQL5\Projects\UserLists | 整數類型節點的類 |
| 15 | CIntList.mqh | %MQL5\Projects\UserLists | CNodeInt 節點的列表類 |
| 16 | CRandom.mqh | %MQL5\Projects\UserLists | 隨機數生成器的類 |
| 17 | CVertLineNode.mqh | %MQL5\Projects\UserLists | 處理垂直線條框架的節點類 |
| 18 | Stat_collector.mq5 | %MQL5\Projects\UserLists | 含有統計數據收集例子的腳本 |
參考文獻:
- A. Friedman, L. Klander, M. Michaelis, H. Schildt. C/C++ Annotated Archives.Mcgraw-Hill Osborne Media, 1999. 1008 頁。
- V.D. Daleka, A.S. Derevyanko, O.G. Kravets, L.E. Timanovskaya. Data Models and Structures.Study Guide.Kharkov, KhGPU, 2000. 241 頁(俄文)。